How to Install a Doorbell Alert System for Hearing Impaired: No Electrician Needed

A clear, step-by-step walkthrough for setting up the Bellman doorbell alert system - from taking it out of the box to your first successful test alert - with no tools, no wiring, and no technical experience required. Most people finish in under ten minutes.
Installing a Bellman doorbell alert for hearing-impaired people requires no electrician: mount the door transmitter near your existing doorbell, plug in the Bluetooth Bridge, and pair your Watch Receiver - total setup under 10 minutes. No wiring, no drilling, no technical knowledge required.
What You Need Before You Start
Good news: the list is short. You don't need any tools, any prior technical experience, or any changes to your home's electrical system. Here's everything required.
The Bellman Doorbell System
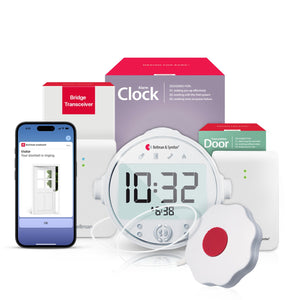
The Doorbell System with Bluetooth Bridge and Watch Receiver includes all three core components: the door transmitter, the Bluetooth Bridge, and the Watch Receiver. Everything needed to get started is in the box.
A Standard Wall Outlet
The Bluetooth Bridge plugs into any standard 120V US wall outlet. No special wiring, no dedicated circuit. Any outlet in a reasonably central location in your home will work.
An Existing Doorbell (in almost all cases)
The door transmitter detects the sound of your existing doorbell chime. Wired or wireless, traditional ding-dong or electronic tone - the transmitter's built-in microphone picks it up. If you have no existing doorbell at all, see the note on the push-button option below.
About 10 Minutes
That's the realistic setup time for most people. You don't need a free afternoon. You don't need help from a family member or a technician. The process is genuinely straightforward, and this guide walks you through every step.
If your home has no doorbell button or chime unit at all, the Push Button System with Bluetooth Bridge and Watch Receiver is the right starting point instead. It uses a portable push button transmitter that anyone can press to send an instant wrist alert - no chime unit required. Setup is identical to the process described in this guide.
How the Three Pieces Fit Together
Before you start placing components, it helps to understand what each piece does and why it goes where it goes. The Bellman doorbell alert system has three parts that work as a chain.
When someone presses your doorbell button, your existing chime sounds as normal. The door transmitter hears the chime through its microphone and immediately sends a Bluetooth signal to the Bridge. The Bridge relays that signal to the Watch Receiver on your wrist - typically within one to two seconds of the button press. The watch vibrates and displays a doorbell icon so you know exactly what kind of alert it is.
That's the complete chain. No internet required. No phone involved for the core alert. No Wi-Fi password to enter. The system works independently of your home network.
Step-by-Step Installation
Unbox everything and identify the three components
Take everything out of the box and lay the three pieces side by side: the door transmitter (small, rectangular, with a microphone grille on the front), the Bluetooth Bridge (the larger plug-in hub), and the Watch Receiver (the wrist device). Also locate the power adapter for the Bridge, any included batteries, and the instruction booklet.
Insert batteries into the door transmitter and the Watch Receiver if they aren't pre-installed. Battery compartments are on the back of each device and open with a fingernail - no screwdriver needed.
💡 Tip: Keep the instruction booklet nearby for the pairing sequence in Step 4. You won't need it for anything else.Find your existing indoor doorbell chime unit
This is the box - usually mounted on a wall in a hallway, near the front door, or in a utility area - that makes a sound when someone presses your doorbell button outside. It's typically a rectangular box about the size of a paperback book. Some homes have electronic digital chime units; others have the classic mechanical ding-dong type. Either works.
If your home has an intercom-style system or a video doorbell with a built-in speaker instead of a separate chime unit, see the placement tips in Section 7 for guidance on transmitter positioning.
💡 Tip: Can't find your chime unit? Press your doorbell button from outside and listen for where the sound is coming from inside the house. That's where your chime unit is.Position the door transmitter near the chime unit
Place the door transmitter within approximately 12 inches (30 cm) of your indoor chime unit, with the microphone grille facing toward the chime. The transmitter can sit on a shelf, a window ledge, or the top of a piece of furniture nearby. It does not need to be mounted to the wall.
The transmitter uses sound detection - it listens for the specific chime pattern and ignores other household sounds. Getting it close to the chime source gives it the clearest signal to detect. You can fine-tune the exact position during testing in Step 5.
💡 Tip: Don't place the transmitter directly on top of the chime unit if there's vibration - rest it on a nearby surface instead so the microphone can pick up the airborne sound clearly.Plug in the Bluetooth Bridge
Plug the Bluetooth Bridge into a standard wall outlet. Choose an outlet in a reasonably central location - a hallway, a main living area, or somewhere between the front door and the rooms where you spend most of your time. The Bridge needs to be within Bluetooth range of both the door transmitter and the Watch Receiver simultaneously.
The Bridge powers on automatically when plugged in. A light indicator on the Bridge will show it is active. No configuration is required at this stage - the pairing comes next.
💡 Tip: A central hallway outlet is usually ideal. Avoid placing the Bridge in a basement or at the far end of the house from where you spend most of your time.Pair the door transmitter to the Bridge
Follow the pairing steps in the instruction booklet to link the door transmitter to the Bluetooth Bridge. The process typically involves pressing a button on the Bridge and then triggering the transmitter - either by pressing a pairing button on the transmitter itself, or by having someone press your doorbell button outside to generate a chime detection event. The Bridge will confirm successful pairing with a light or audio indicator.
This step takes about one to two minutes. The exact button sequence is in your instruction booklet, which provides the clearest guidance for your specific model.
💡 Tip: If you live alone and need to trigger the doorbell button from outside during pairing, prop the front door open so you can hear the Bridge confirmation signal when you come back inside.Pair the Watch Receiver to the Bridge
Put on the Watch Receiver and power it on using the button on the side. Then follow the pairing steps in the instruction booklet to link the watch to the Bridge - again, this typically involves pressing a button on the Bridge and confirming on the watch. The watch display will show a confirmation that pairing is complete.
The Watch Receiver shows different icons for different alert types - a doorbell icon for the doorbell transmitter, a flame icon for a smoke transmitter if you add one later, and so on. After pairing, the doorbell icon should appear on the watch face when the doorbell is triggered.
💡 Tip: Make sure the Watch Receiver has sufficient charge before pairing. A low battery can cause intermittent pairing behavior.Testing Your Setup and Confirming It Works
Once both the door transmitter and the Watch Receiver are paired to the Bridge, it's time to test. This is the most satisfying part - and it takes about two minutes.
Confirm every link in the chain is working
Do this before relying on the system day-to-day.
- Put on the Watch Receiver and move to a different room from the Bridge - this tests real-world range
- Have someone press your doorbell button from outside (or step outside and press it yourself)
- Confirm your existing chime sounds as normal - the transmitter needs to hear it
- Watch for the Watch Receiver to vibrate and display the doorbell icon within 1–2 seconds
- If successful: your system is working correctly - you're done
- If no alert: check that the door transmitter is within range of the chime, and that the Bridge is powered on
- Repeat the test from different rooms in your home to confirm reliable whole-house coverage
- Test wearing the watch in the bathroom with the door closed - a common real-world scenario
Most users are surprised by how fast the alert arrives. There's almost no perceptible delay between pressing the button and feeling the watch vibrate.
Bellman Customer FeedbackAdding Smartphone Alerts (Optional)
The core system - door transmitter, Bridge, and Watch Receiver - works completely without a smartphone. The wrist alert is always the primary notification channel. But if you'd also like a push notification to your phone when the doorbell fires, you can add that as an optional secondary layer.
- Download the Bellman Connect app on your iOS or Android smartphone
- Open the app and follow the steps to pair it with your Bluetooth Bridge
- Once paired, your phone will receive a push notification simultaneously with the wrist alert whenever the doorbell fires
- Smartphone alerts require an active internet connection; the wrist alert does not
- You can have multiple smartphones paired to the same Bridge - useful for couples or caregivers
Push notifications depend on your phone being charged, nearby, not silenced, and connected to the internet. In a real day at home, phone charging in the bedroom, in a bag, on silent during a call - notifications are easily missed. The Watch Receiver on your wrist doesn't have any of those failure modes. It's always on, always with you, and doesn't require internet. That's why the wrist alert is the one to rely on, with smartphone notifications as a helpful extra layer.
Troubleshooting: If Something Doesn't Work
The Bellman system is designed to be reliable right out of the box, but if your test doesn't produce the expected result, these are the most common causes and fixes.
Watch didn't vibrate during test
First, confirm the Bridge is powered on (check the indicator light). Then confirm the door transmitter is paired - press the pairing button on the transmitter and watch for a response on the Bridge. If neither step resolves it, try re-pairing the transmitter to the Bridge from scratch, following the instruction booklet.
Transmitter isn't detecting the chime
Move the door transmitter closer to the chime unit - ideally within 6–8 inches, with the microphone grille facing the speaker opening of the chime box. Some digital chime units have quieter output; moving the transmitter closer almost always resolves detection issues.
Alert works near the Bridge, but not in other rooms
The Bridge may be positioned too far from where you're spending time, or a thick wall is attenuating the Bluetooth signal. Try moving the Bridge to a more central outlet - a hallway or main living area - so it has a shorter path to the rooms you use most.
Watch Receiver shows low battery or doesn't respond
Charge the Watch Receiver fully before testing. A low-battery state can cause the watch to miss pairing events or fail to display alerts consistently. Most Watch Receivers take 1–2 hours to reach a full charge from empty.
False alerts - watch vibrating when no one rang the bell
The door transmitter is detecting a sound in the environment that matches the chime pattern. Move the transmitter away from TV speakers, music systems, or other sound sources. Alternatively, check if the sensitivity setting on the transmitter can be adjusted - some models allow this.
Smartphone alerts not arriving
Check that the Bellman Connect app has notification permissions enabled in your phone's settings. Also confirm your phone is connected to the internet. Remember: the smartphone app requires internet connectivity; the wrist alert does not. If only smartphone alerts are failing, the core system is working fine.
Placement Tips for the Best Results
The right placement of each component has a meaningful impact on system reliability. Here's what to optimize for.
Door Transmitter Placement
- Place it as close to the chime speaker as possible - ideally within 6–12 inches
- Face the microphone grille toward the sound source, not away from it
- Keep it away from TVs, radios, and other sound sources that could cause false alerts
- A shelf or window ledge near the chime unit works perfectly - no mounting required
- For homes with a video doorbell (Ring, Nest) instead of a traditional chime: place the transmitter near the video doorbell's internal speaker or chime adapter if one is present
Bluetooth Bridge Placement
- Central location in the home - typically, a hallway outlet is ideal
- Within Bluetooth range of both the door transmitter and the areas where you spend time
- Avoid basements, closets, or locations behind large metal appliances, which can attenuate Bluetooth signals
- Standard Bluetooth range is approximately 30 metres (100 feet) in open space; real-world through-wall range is typically 15–25 metres
- If your home is large or multi-floor, test reception in your most-used rooms and adjust Bridge position accordingly
Watch Receiver
- Wear it - that's the entire placement strategy for the Watch Receiver
- The watch is designed to be worn continuously during waking hours; many users find it comfortable enough to wear during sleep as well
- Keep it charged overnight using the included cable so it starts each day at full battery
Expanding Your System Over Time
One of the most practical aspects of the Bellman system is that the same Bridge and Watch Receiver you set up today can handle additional alert types in the future - without buying a new hub or a new receiver.
The Bellman Bluetooth Bridge supports multiple paired transmitters simultaneously. Add a smoke/fire transmitter, and the same watch vibrates with a flame icon when the smoke alarm fires. Add a baby monitor transmitter, and the watch shows a baby icon when the baby cries. Each alert type has its own distinct icon on the watch face, so you always know exactly what needs your attention.
This expandability means you're not buying a one-trick device. You're building a whole-home alert infrastructure - one Bridge, one receiver on your wrist, covering every alert type your home needs. For a deeper look at how the push button fits in as a standalone or supplementary transmitter, see: Push button alert system for deaf people: the call-for-attention solution.
Notes for Renters and Apartment Dwellers
The installation process described in this guide requires absolutely no permanent modifications to your home or apartment. Nothing is drilled, glued, or wired. The door transmitter sits on a surface. The Bridge plugs into an outlet. The whole system is as removable as a lamp.
This makes the Bellman system one of the few hearing loss assistive devices that work equally well in rental properties, apartments, condos, and temporary housing. When you move, the entire system comes with you - unplug, pack, and set up identically in the next place.
For apartment-specific considerations - including how to handle intercom-style entry systems, buzzers, and buildings without a traditional chime unit - see our dedicated guide: Deaf doorbell systems for apartments: what works when you can't drill.
Adding Overnight Alerts: Sleep Bundles
The Watch Receiver setup described in this guide covers you during the day - whenever you're awake and wearing the watch. But nighttime is a different situation. When hearing aids come out and you're asleep, even a wrist vibration can go unnoticed during deep sleep.
For reliable overnight alerting, Bellman offers sleep bundles that pair the Bluetooth Bridge and an alert transmitter with an Alarm Clock featuring a built-in bed shaker. The bed shaker goes under your mattress and vibrates the entire bed when triggered - far more effective at waking a sleeping person than a strobe or a wrist vibration alone.
- Bridge + Smoke/Fire Monitor + Alarm Clock - overnight fire and CO alerting with bed shaker wake-up
- Bridge + Door Transmitter + Alarm Clock - overnight doorbell alerting with bed shaker
- Bridge + Baby Monitor + Alarm Clock - overnight baby monitor alerts with bed shaker
- Bridge + Push Button + Alarm Clock - bedside call button with overnight bed shaker notification
If you already have a Bridge and Watch Receiver from your doorbell setup, you can add the Watch Receiver separately for daytime use and rely on the Alarm Clock bed shaker for nighttime coverage - the same Bridge handles both.
- Standard smoke alarms rely on audible sirens - ineffective for profoundly deaf sleepers
- Hearing aids out means no auditory alerts reach you at all during sleep
- A wrist vibration alone may not wake someone in deep sleep
- A bed shaker under the mattress is the most reliable overnight wake method
- The Bellman Alarm Clock bed shaker connects to the same Bridge as your doorbell
- One Bridge can trigger both the Watch Receiver and the bed shaker simultaneously
Frequently Asked Questions
Do I need to be tech-savvy to set this up?
No - this is a core design principle of the Bellman system. If you can plug a lamp into a wall and press a button, you can set this up. There's no router login, no app required for the core system, and no technical knowledge assumed. The instruction booklet uses plain language with clear diagrams, and this guide covers every step in full detail.
Will the transmitter work with my doorbell type?
In almost all cases, yes. The door transmitter uses an acoustic microphone to detect the sound your chime makes - wired or wireless, traditional ding-dong, or electronic digital tone. As long as your chime produces a sound when the button is pressed, the transmitter can detect it. For video doorbells with a chime adapter or indoor speaker, position the transmitter near that speaker.
Does the system require Wi-Fi?
No. The core alert chain - transmitter to Bridge to Watch Receiver - works via Bluetooth and requires no internet connection whatsoever. Your wrist alert functions even if your router is off or your internet service is down. Wi-Fi is only needed if you choose to add smartphone push notifications via the Bellman Connect app.
What if I live alone and can't press the doorbell from outside during setup?
Most pairing steps can be completed using the transmitter's built-in pairing button rather than requiring a live doorbell press. The instruction booklet covers both methods. Alternatively, prop the front door open, press the doorbell button, and come back inside to complete the pairing confirmation on the Bridge - it takes about ten seconds outside.
How long does the Watch Receiver battery last?
Battery life varies by usage and model, but most users charge the Watch Receiver nightly via the included cable - similar to charging a smartwatch. A full charge typically lasts through a full waking day of use. Charging nightly ensures you start each day at full battery with reliable alert reception.
Can two people in the same house both receive alerts?
Yes. The Bellman Bluetooth Bridge supports multiple paired receivers simultaneously. If both partners want wrist alerts, pair two Watch Receivers to the same Bridge. You can also combine one Watch Receiver with smartphone app notifications for a second person - all triggered by the same door transmitter and Bridge.
What if I want to move the system to a new home?
Unplug the Bridge, pick up the door transmitter, and pack the watch. The entire system re-installs identically in a new home - same process, same ten minutes. Nothing is left behind and nothing needs to be reconfigured. This portability is one of the key practical advantages of a wireless system over any wired alternative.
Ready to set up yours? It really does take ten minutes.
The Bellman Doorbell System with Bluetooth Bridge and Watch Receiver - everything you need in one box, designed for non-technical setup from day one.
Sources and references: National Institute on Deafness and Other Communication Disorders (NIDCD) - Quick Statistics About Hearing (2026) · Hearing Loss Association of America (HLAA) - Assistive Listening Devices; Hearing Loss Facts and Statistics · Americans with Disabilities Act (ADA) - Accessible Design Guidelines for Alerting Systems · Bellman & Symfon - Doorbell System with Bluetooth Bridge and Watch Receiver; Bluetooth Bridge; Watch Receiver product specifications and installation documentation (us.bellman.com).
This article is for informational purposes only and does not constitute professional safety or medical advice. For clinical guidance on hearing loss, consult a licensed audiologist or healthcare provider.

How to Install a Doorbell Alert System for Hearing Impaired: No Electrician Needed
This guide breaks down the practical choices, features, and considerations behind this topic. Use it to identify a setup that fits the listener, the environment, and the everyday moments that matter most.
The featured products below are current Bellman options discussed in the article or closely matched to its use case.